
Connecting the hardware
If your PiVoyager didn't come with a pre-soldered 40-pin GPIO header, you will first need to solder one to the board. The simplest approach is to first solder pin 1 and then check that the header is correctly positioned. In case an adjustment is needed, you can melt again the solder on pin 1 and move the header slightly. Next do the same for pin 40, making adjustments if necessary. After that, you can solder all remaining pins.
As a quick test, before mounting the PiVoyager on top of your Raspberry Pi, you can power the PiVoyager with a USB cable. All LEDs, except the yellow one, should turn on. Once you have mounted the PiVoyager on top of your Raspberry Pi, make sure that the USB power supply you use provides enough current to power the Raspberry Pi. Never power both the Raspberry Pi and the PiVoyager simultaneously. In general, in order to work reliably with a Raspberry Pi, the PiVoyager should always be connected to a battery, even if it's not charged.
Next, select a LiPo or Li-Ion battery that matches the following requirements:
- Has a nominal voltage of 3.7V and a charging voltage of 4.2V.
- Has built-in protection against over-heating, over-charge, and over-discharge.
- Accepts a charging current of 1000mA.
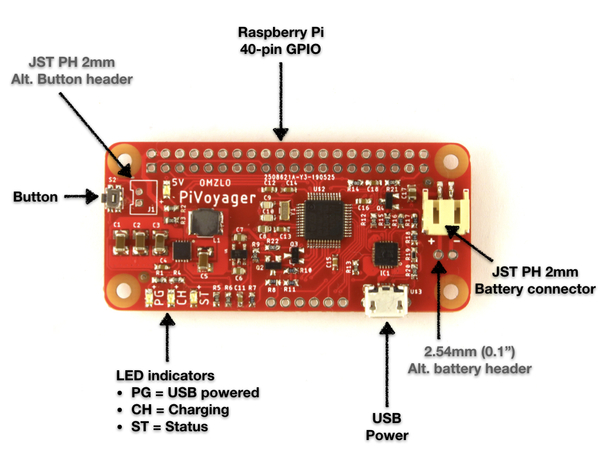
If the battery is equipped with a 2mm JST connector, you can directly plug it into the PiVoyager. You can find these batteries from your favorite vendor, including Adafruit, Pimoroni, or Sparkfun. If you don't really know what to get, pick a Lithion-Ion battery with a capacity of 2000mA and a 2mm JST connector (like this one).
Alternatively, the PiVoyager also offers a two pin 0.1" header (2.54mm), that can be used to place an alternative battery connector or battery wires. In all cases double-check the polarity of the battery connector. A few rare times, we've seen batteries with reversed connectors. There are + and - signs on the board that serve as polarity indicators.

When both the battery and the USB power source are connected to the PiVoyager, all four LEDs should be on. The yellow LED will blink if the battery is charging and will be fully on if the battery is fully charged.
Installing the software
The PiVoyager communicates with the Raspberry Pi using the I2C protocol.
We have created a tool simply called pivoyager, which communicates with the PiVoyager hardware using I2C.
I2C can be enabled on the Raspberry Pi by following these steps:
- On the command line, run
sudo raspi-config. - In the menu, select
5 Interfacing Options. - Next select
P5 I2C. - Choose
yeswhen asked if you want to enable I2C - Select
. - Choose
yeswhen asked if you want to reboot.
Next, download the file pivoyager.tar.gz from our website.
Then you should extract the pivoyager executable from pivoyager.tar.gz.
On your Raspberry Pi, you can do this from the command line as follows:
curl -O https://www.omzlo.com/downloads/pivoyager.tar.gz
tar xvf pivoyager.tar.gz
To make your life easier, move the tool to /usr/local/bin/:
sudo mv pivoyager /usr/local/bin/
You can now use the resulting executable called pivoyager to control your PiVoyager.
As a first step, try typing pivoyager status. You should get an output that is similar to the following:
Status(30): stat1 stat2 5v
Battery: discharging
VBat: 4.02V
VRef: 3.32V
Using the PiVoyager
The next paragraphs describe some common tasks that can be achieved with the PiVoyager.
Manually switching power on and off
You can cut the power to the Raspberry-Pi and put the PiVoyager in "standby mode" by pressing the side button for more than 3 seconds. The green status LED will start blinking rapidly and the device will enter standby mode when the button is released.
It is not recommended to cut the power to the Raspberry-Pi when it is fully running, as this may result in data loss and sd-card corruption.
To leave "standby mode" press the side button again briefly.
Detecting if running on battery
Typing pivoyager status provides the current status of the PiVoyager:
When the PiVoyager runs on battery, the output of the command will look like this:
Status(30): stat1 stat2 5v
Battery: discharging
VBat: 4.02V
VRef: 3.32V
The line Battery: discharging indicates that the PiVoyager is running on battery, and VBat: 4.02V indicates that the
current battery voltage is approximately 4V.
On the other hand, when the PiVoyager is running on USB, the output of the command will look like this:
Status(29): pg stat2 5v
Battery: charging
VBat: 4.19V
VRef: 3.32V
The line Battery: charging shows that the battery is currently being charged. When the battery reaches full charge, it will show Battery: charge complete. In addition, the Status has a field called pg (for power good) which indicates that the device is USB powered.
The status flags can be displayed alone by typing pivoyager status flags.
A bash script can use that information to detect if we are running on USB power or otherwise on battery:
if ./pivoyager status flags | grep "pg"; then
   echo "We are running on USB"
fi
Setting and reading the clock
The PiVoyager has "Real Time Calendar". To configure the calendar to June 18th, 2019 at 9:04pm UTC, simply type:
pivoyager date 2019-06-18T21:04:00Z
Time is formatted according to RFC3339.
Next, you can read back the calendar by typing pivoyager date. The calendar will be kept updated as long as the PiVoyager is powered by battery or USB. Time is displayed as UTC to avoid any ambiguity.
You can check if the RTC is initialized by typing pivoyager status flags. If the flag inits is present, it means that the calendar has been set.
If the raspberry pi has a valid system time, e.g. through NTP, the PiVoyager's RTC can be synched to this time by typing pivoyager date sync. This is useful for programming alarms (see below).
Gracefully shutting down a Raspberry-Pi
When you shut down a Raspberry Pi, for example by typing shutdown now, it will enter a quiescent state where it continues to eat 30 to 50mA, sometimes more depending on connected peripherals. You can use the PiVoyager's "watchdog" to fully cut off power to the Raspberry-Pi, thereby saving considerable power, especially if you are running on battery.
Assuming it takes 20 seconds for your Raspberry Pi to shut down, you can program a full power cut as follows:
pivoyager watchdog 25
shutdown now
Here, the command pivoyager watchdog 25 tells the PiVoyager to fully cut power to the raspberry pi in 25 seconds (we leave a 5-second margin).
By default, the Raspberry Pi will automatically restart when the user presses the side button. But other options are possible, including waking up on an alarm or after a predefined delay as described further below.
If your Raspberry-Pi is running on battery when you shut down, you might want it to automatically start up again when USB power is restored. This can be done by enabling the power-wakeup option before issuing the power down commands as follows:
pivoyager enable power-wakeup
pivoyager watchdog 25
shutdown now
Running a UPS script
Putting together the previous elements, we can write an example bash script that will act as a UPS script, performing the following actions:
- Wait until the Raspberry Pi runs on battery.
- Warn users and wait 30 seconds.
- Initiate a full shutdown.
This gives us a bash script that should be executed each time the Raspberry Pi starts up:
#!/bin/bash

# This should point to the pivoyager executable
PIVOYAGER=/usr/local/bin/pivoyager

while true;
do
   # Phase 1: Check every 5 seconds if we are USB powered.
   #          If we are not on USB power, go to phase 2.
   while $PIVOYAGER status flags | grep "pg";
   do
      sleep 5
   done


   # Phase 2: Do something before shutdown. (optional)
   #          e.g. send an email, warn users, etc.
   wall "We are now running on battery. Save your work now! We will initiate a shutdown in 30 seconds."
   sleep 30


   # Just check if power was miraculously restored.
   if ! $PIVOYAGER status flags | grep "pg"; then
      break
   else
      wall "Power was restored. Shutdown aborted!"
   fi
done

# Phase 3: Initiate the shutdown.
#          - Enable automatic power on once USB power is restored.
#          - Program full power cut in 25 seconds.
$PIVOYAGER enable power-wakeup
$PIVOYAGER watchdog 25
sudo shutdown now
You can use systemd do make this script run automatically each time the Raspberry-Pi starts up as we suggest for the PiWatcher.
Waking up on an alarm
It is possible to program a Raspberry Pi to wake up at a specific time every day (or even at a certain date within the current month). You will need to initialize the RTC of the PiVoyager, as described a few paragraphs above.
For example, to wake up a Raspberry Pi every day at 12:15, you would type:
pivoyager alarm *-12-15-00
If you initiate a graceful shutdown as described previously, the Raspberry Pi will boot up again when the RTC reached 12:15.
Instead of waking up at a certain time, it's possible to program the device to boot up the Pi after a delay expressed in seconds. For example, to tell the PiVoyager to boot up a Raspberry Pi one hour after it shuts down, you could type pivoyager wakeup 3600. Note that the wakeup function and the alarm are mutually exclusive: you cannot have both at the same time.
Using a GPIO watchdog, as an alternative
By default, the PiVoyager uses I2C as a watchdog as described previously.
As an alternative, it's possible to use the GPIO pin 26 (BCM) as a watchdog: we set the pin to 1 (HIGH) and if it goes to 0 (LOW) for more than a predefined number of seconds, the PiVoyager will shut down power to the Raspberry Pi.
Note that when a raspberry pi is halted by the user using a command such as sudo halt, all pins are normally reset to zero.
This would, therefore, trigger the GPIO watchdog and fully power down the Raspberry Pi.
Let's assume that we want the Raspberry Pi to fully power down after 15 seconds once GPIO pin 26 (BCM) goes LOW. This is how we can configure this to happen:
gpio -g mode 26 output
gpio -g write 26 1
pivoyager enable gpio-watchdog
pivoyager watchdog 15; pivoyager disable i2c-watchdog
The example assumes that the gpio utility is installed on the raspberry pi (wiringpi).
The only trick here is that the command pivoyager watchdog 15 enables by default the i2c watchdog.
This is why we need to immediately disable that option with pivoyager disable i2c-watchdog.
Shutting down the Raspberry-Pi with a button press
Pressing the button on the PiVoyager for more than 3 seconds will do a "hard" shutdown of the Raspberry-Pi, which is not what most people want to do. A better alternative is to detect a short button press and initiate a controlled shutdown.
If you have a PiVoyager plugged into a Raspberry Pi, and you type "pivoyager status", you'll get an output similar to this:
Status(13): pg stat2 5v
Battery: charging
VBat: 4.20V
VRef: 3.31V
Now if you briefly press the button on the board, you'll get an extra flag indicating a button press like this:
Status(141): pg stat2 5v button
Battery: charging
VBat: 4.12V
VRef: 3.30V
You can clear this button status flag at any time after a button press by typing pivoyager clear button.
This flag can be exploited with a simple bash script that checks the button status on the Raspberry Pi and initiates a shutdown, e.g.:
while true; do
  if ./pivoyager status | grep 'button'; then
     sudo shutdown now
  fi
  sleep 5
done
To take advantage of the ability of the PiVoyager to fully cut power to the Raspberry-Pi and reboot on a button press, the script should be extended with a watchdog timeout, e.g.:
while true; do
  if ./pivoyager status | grep 'button'; then
     pivoyager watchdog 15
     sudo shutdown now
  fi
  sleep 5
done
This script can be easily extended with more features and started at boot-time following the model described above for a UPS.
Getting help
Typing pivoyager help provides a lot of useful information:
This is pivoyager version 0.1, (c) Omzlo P.C. [omzlo.com]
Syntax: pivoyager <command> (options...)
Valid commands are:
       alarm:  Get current alarm date, or set it (alarm <alarm-pattern>).
                The format of <alarm-pattern> is day-hour-minute-second, where:
                - day is "Mon", "Tue", ... "Sun" to select a day of the week.
                - day is 1-31 to identify a day of the month
                - day is "*" to ignore the day
                - hour is 0-24 to select an hour, or "*" to ignore
                - minute is 0-59 to select a minute or "*" to ignore
                - second is 0-59 to select a second or "*" to ignore

       clear:  Clear a status bit (clear <flags>).
                The value <flags> can be either "button" or "alarm".

        date:  Get the current RTC time, or set it (date <utc-time-RFC3339>.
                Use 'date sync' to use the current operating system date for the RTC.
                Time is typically expressed as UTC time to avoid any ambiguity.
                See RFC3339 for a valid date format.

     disable:  Disable configuration options for watchdog and wakeup.
                See 'enable' command for options.

      enable:  Enable configuration options for watchdog and wakeup
                Options are:
                - "i2c-watchdog" enable i2c based watchdog.
                - "gpio-watchdog" enable GPIO 26 watchdog (pin 37 on 40-pin header).
                - "timer-wakeup" enable wakeup after timer, as set with wakeup command.
                - "alarm-wakeup" enable wakeup on alarm.
                - "power-wakeup" wakeup if USB power goes up (only if it was down during shutdown).
                - "button-wakeup" wakeup if user presses button.
                - "low-battery-shutdown" shutdown if the battery is low, after timer expires.
                Note: "timer-wakeup" cancels "alarm-wakeup".

       flash:  Flash the new firmware file in 'bin' format (flash example.bin).
                Note: the PiVoyager must be in bootloader mode for this command to succeed.
                      Bootloader mode is activated by first removing all power to the PiVoyager and
                      then powering the device while simulaneously pressing the button.
                      Once in bootloader mode, the device leds will blink in sequence.

        help:  Prints this message.

  low-battery-timer:  Get or set how much time to wait (in seconds) before shutting down when the battery is low.
                Note: By default this timer is set to 60 seconds.

      status:  Get the current UPS status of the PiVoyager.
                - "status flags" shows system status flags.
                - "status battery" shows battery status (e.g. "charging").
                - "status volatge" shows battery and reference voltage.
                - "status" shows all of the above.

      wakeup:  Get wakeup information, or set wakeup time (wakeup <seconds>)
                Note: "wakeup" sets an alarm, overriding any alarm previously set.

    watchdog:  Get watchdog information, or set watchdog time (watchdog <seconds>)
Changing the charge current to 500mA (bug)
The PiVoyager was normally designed to allow the default charge current of 1000mA to be reduced to 500mA, by simply cutting a trace and adding a blob of solder across two pads. Unfortunately, due to a hardware bug, this feature is not available as initially advertised.
It is still possible to change the charge current to 500mA, by desoldering resistor R13 and replacing it with a 2K resistor. More generally, the charge current Ic can be defined as Ic = 1000/R13 with Ic expressed in mA and R13 expressed in Kilo-ohms, where R13 must be greater or equal to 1K. For example, when R13 is 4K, the charge current becomes 250mA.
Resources
For more information the PiVoyager, please go the the main project page. You can purchase one from our online store and we will ship it anywhere in the world.