
In a previous blog post, we described a bug in the Arduino SAMD21 core that caused the classic analogRead() function to return erroneous results, with results suffering an offset of around 25 to 50mV. The bug seems to affect all popular Arduino boards based on the SAMD21 from Arduino, Sparkfun or Adafruit, including our very own CANZERO IoT node.
The bug has existed for four years, at least, and caused us great surprise and was extensively discussed on Hackaday as well as in a blog entry on Hackster.io by Alasdair Allan.
The bug was recently fixed by Arduino with the release of version 1.8.4 of the Arduino SAMD21 core. Our CANZERO board received the bugfix recently as well, with an update to the Arduino board file. As far as we have observed, the bug is still present on Sparkfun and Adafruit boards.
With the release of the Arduino fix, we decided to plug our meter in our Arduino MKRZERO and see how the situation has improved.
So much better!
We applied different voltages to the Arduino pin A0, and recorded the voltage measured by the Arduino.
The setup we used is the same as the one we used in our previous blog post, so we won't repeat it here. However, we made one change to the way we translate the measured 12bit ADC results into a voltage. The original sketch in our previous blog post used the following formula:
float v = 3.3*((float)a)/4095;
It turns out that a more correct way to do the translation is as follws:
float v = 3.3*((float)a + 0.5)/4096;
There are numerous sources online explaining why the second formula is more accurate, so we won't go into further details here (see here for more info). We can note that the difference between the two formulas is less than 1mV in the worst-case scenario, with a 12bit ADC, so it's not a strong error factor, but useful to know.
The following table shows the new results obtained after the bug fix:
| Target Voltage | Meter Reading | ADC reading | Error in mV (rounded) |
|---|---|---|---|
| 0 | 0,001 | 0,007 | 6 |
| 0,5 | 0,5066 | 0,512 | 5 |
| 1 | 1,007 | 1,011 | 4 |
| 1,5 | 1,5058 | 1,51. | 6 |
| 2 | 2,0029 | 2,007 | 4 |
| 2,5 | 2,503 | 2,510 | 7 |
| 3 | 3,0053 | 3,014 | 9 |
The new readings show a big improvement over the previous results we found. Instead of a 35mV offset, we now see an error that is around 5 or 6mV. At this level, it's reasonable to take a closer look at the measuring method, and potential inaccuracies due to the meter itself.
As already mentioned in our previous blog post, one source of error in the formula v = 3.3*((float)a + 0.5)/4096 is the assumption that the voltage reference is precisely 3.3V.
In our case, we found that the voltage reference was actually 3.292V. Taking this into account we can re-calculate the previous table:
| Target Voltage | Meter Reading | ADC reading (corrected) | Error in mV (corrected) |
|---|---|---|---|
| 0 | 0,001 | 0,007 | 6 |
| 0,5 | 0,5066 | 0,5108 | 4 |
| 1 | 1,007 | 1,0085 | 2 |
| 1,5 | 1,5058 | 1,5083 | 3 |
| 2 | 2,0029 | 2,0021 | 1 |
| 2,5 | 2,503 | 2,5039 | 1 |
| 3 | 3,0053 | 3,0067 | 1 |
The error is now literally gone, except at the very lower end of the range. In simple words: the bug fix works well, and the Arduino SAMD21 ADC provides accurate results.
Using an external voltage reference for consistent results
As we noted, using the 3.3V supply voltage as a reference can introduce some inaccuracies. For most Arduino applications, this doesn't matter, but when more precision is needed, you will need to check your the "real" value of your supply voltage, as we did above. And that value might change from board to board, or perhaps depending on the power consumption of your board, or with temperature. But there is another more practical solution: using a precision external voltage reference connected to the AREF pin. You need to configure your Arduino sketch to use the AREF pin as a voltage reference instead of the default board supply, using the analogReference() function (see here).
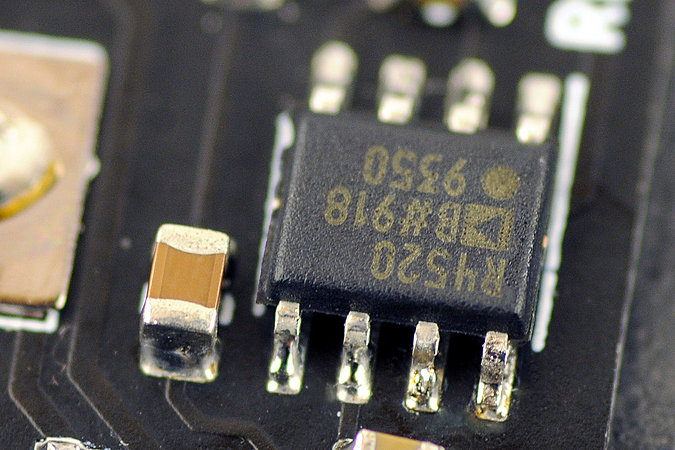
There are many chips specifically designed to provide a precision voltage reference, with limited changes through time and temperature. Out of curiosity, we tried the Analog Device ADR4520BRZ, which provides a 2.048V reference. While expensive, the chip has some impressive specs: an initial voltage output error of less than 0.02% and a temperature variation of less than 2ppm/C.
We changed the voltage reference in our Arduino sketch and adjusted our ADC formula to:
float v = 2.048*((float)a + 0.5)/4096;
With our new setup featuring the ADR4520 connected to AREF, we got the following results:
| Target Voltage | Meter Reading | ADC reading | Error in mV (corrected) |
|---|---|---|---|
| 0 | 0,001 | 0,006 | 5 |
| 0,5 | 0,5069 | 0,506 | 1 |
| 1 | 1,0072 | 1,006 | 1 |
| 1,5 | 1,5061 | 1,504 | 2 |
| 2 | 2,0032 | 2,000 | 3 |
The results are great again. But this time, there was no need to make any correction for voltage reference inaccuracies!
A voltage reference on the go!
Since the ADR4520 seems so precise, it was an excellent opportunity to check that our meter was reasonably well calibrated by reading the output voltage. Good news: our meter showed a reading oscillating between 2.047 and 2.048V!
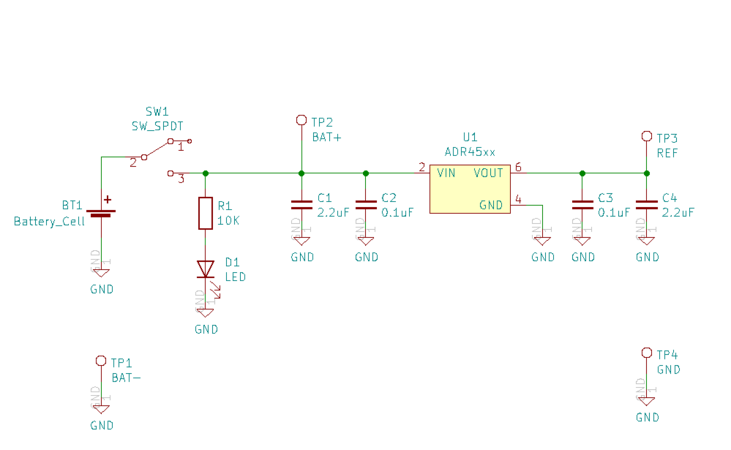
The ADR4520 can easily be connected to a coin-cell battery, a status LED, and a switch to provide a voltage reference "on-the-go." So we built one as shown on the schematic below.
We can fit it all on quite a small PCB.
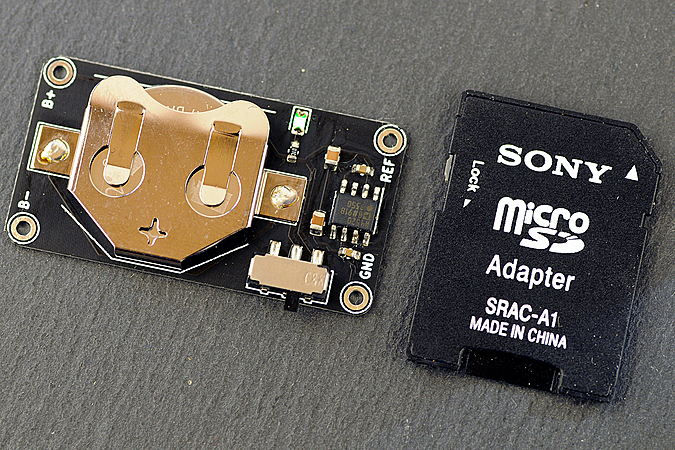
Of course, the PCB also doubles as a lovely tiny little business card!
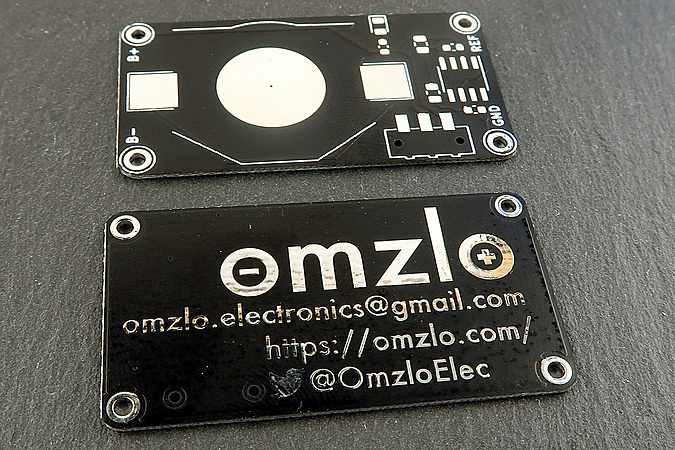
Next time you see Omzlo at a hardware hacking event, don't forget to ask for exactly ... 2.048V!
Comments
I think there is a type with the reference voltage: 2.292V -> I guess you meant 3.292V
heptan, about 6 years ago@heptan: fixed it, thanks for the catch.
Omzlo, about 6 years agoLeave a comment